
Spot welding even with the advent of "smart" welders is a complicated process, here I list 5 things to do before you weld on the vehicle.
1: Clean The Electrodes
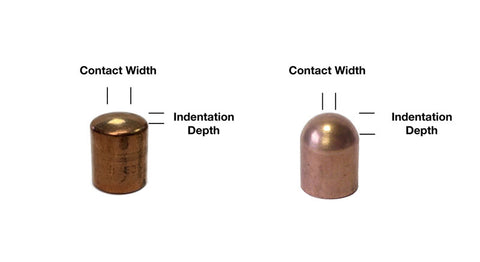
Sounds easy but you would be amazed how many people do not understand the importance of electrode shape.
The new type inverters use a low bevelled electrode usually about 13mm in size although the Weilander Schill GT Invertaspot, Prospot and Tecna Rhino also use 16mm
This was chosen so that large spot weld diameter could be achieved without indenting into the steel too much and thinning it out in the HAZ ( heat affected zone ) area.
Domed electrodes are frowned upon now in modern vehicle repair precisely because of this problem.
The Elektron Mi100 Inverter spot is often found with one bevelled cap and one domed. I get told many times that this is what the manufacturer states should be used. This is misinformation and creates narrow sized, deep penetrating spot welds with increased chances of weld "splash out".
The reason domed electrodes were used is to enable easier welding of Galvanized and Zinc coated steels. The domed shape was used to enable penetration and the melting of these layers at the start of the weld so that the welding current could then weld the steels beneath. Galvanized steels are welded in "pulsed mode" precisely for this purpose. The first pulse melts the galvanizing layer allowing the electrodes to touch the steel layer below for the main welding current pulse to perform the weld. The domed shape of the electrodes also reduces the chances of the Molton Galvanizing layer sticking to the electrode cap. Galvanizing and copper are attracted to each other and so every time you weld little galvanizing sticks to the electrode cap potentially creating weld problems further on as this layer increases.
Domed caps help reduce this but also increase the chances of splashout. They also reduce the nugget diameter.
The good thing is that manufacturers recommend removal of these layers prior to welding using a sander. This then negates the use of the domed electrodes, enabling you to use the correct bevelled electrode and creat the correct nugget diameter.
The trouble with bevelled electrodes is that they wear down too quickly. The radius of the bevel is very shallow so that it doesn't indent the steel too much. This though unless observed soon wears flat. This creates two problems.
- The area of the spot weld is now too large and this can produce substandard weld nuggets due to there not being enough welding current and pressure for the larger surface area to be welded. A "new" bevelled electrode cap has a contact area of say 4mm while a worn electrode cap has a contact area of up to 13mm. This lack of current for the now larger surface area could mean the panel doesn't weld correctly and "ping" apart
- This larger contact area creates a problem for " smart" or automatic modes to work correctly. It makes monitoring of the weld more difficult.
2. Carry Out a Test Tag
Always carry out a test tag prior to welding on the vehicle, this is important! even if you have a "smart" welder.
I've heard some people say you should weld a tag onto the vehicle and pull it, this is a no and is not recommended. The reason for the weld tag is 2 fold:
- To ensure you have the correct setting for the panel you want to weld on the vehicle.
- To ensure you have the correct nugget diameter.
See our post on How To Carry Out A Spot Weld Peel Test
3. Observe Manufacturers Methods
Some manufacturers methods sheets are excellent, Vauxhall and Peugeot being good examples as they either give you a set programme for the panel to be welded or the correct welding parameters. Some are very vague though giving little information apart from a few dots on a drawing.
I always recommend in this instance replacing like for like and explain the reason in my post Are Smart Spotwelders Really Smart
I always use this example when training. "When you drill off 10 spot welds on a vehicle, how many do you replace it with?" Answer 10.
Now if you go to the spot welder you will see most have settings in mm thickness. So the technicians always say they set the machine to the thickness of the panel as instructed by the machine suppliers. Therefore doing this most technicians will pick 1.0mm to 1.5mm. Welding parameters on most machines at these settings will produce a 5mm spot weld.
So now you have welded 10 spot welds of 5mm diameter on the vehicle which may be correct. But what if the spot weld you removed was 8mm?
By replacing with 5mm you have reduced the weld strength of that panel by a third
I always recommend in the advent of a lack of information from manufacturers to replace like for like and carry out a peel test. Never solely rely on "smart" welding or thickness settings.
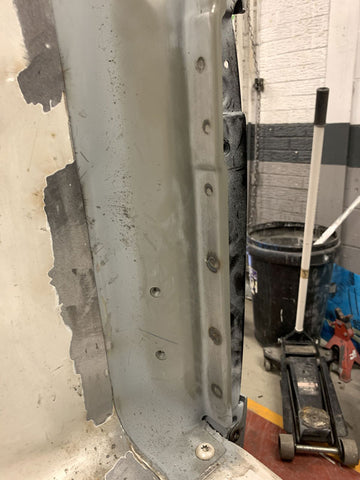
4. Prepare Spot Weld Areas
Explosions are not the fault of the welder, they are the fault of joint preparation or electrode preparation.
Drilling off the old spot welds using HSS Zip Drills leaves a little drilled-out indentation in the old panel. This little "pip" creates an air gap in the joint when the new panel is placed over it. If you then weld in this old spot weld area (as some manufacturers state ) you will likely create large splashout or blow up the new panel due to high resistance in the joint. If you wish to weld in existing old spot welds you need to ensure you remove this "pip" as much as possible before commencement.
See our post on why do i Blow holes when spot welding on vehicles
Its precisely because of this, we recommend placement of your new spot weld next to the old weld. This reduces the chances of expulsion and panel blowouts.
Most technicians as a matter of routine clean off all the edges of the new/old panels ready for welding and for the spraying of rustproofing to the inner joints.
This is a bad technique as it makes it harder to see what are good and bad areas for welding. If you do this though simply run your finger over the back panel feeling for old spot weld indentations and checking that the area next to this is suitable for welding. If it's okay then use a marker pen to mark the spot on the new panel. This makes it easier to locate your welding gun, safe in the knowledge that the area to the rear ( the part you can't see) is okay.
This simple technique will reduce your weld faults significantly.
Personally I don't recommend cleaning off the cathodic primers on the new panel completely. I recommend cleaning as shown and leaving as much of the primer on between my welds as possible.
5. Observe your weld
Welds will alter a little according to the type of stack you are welding (resistance of the joint) so observing the weld appearance as you weld will vastly improve your weld quality. Many welders have indicators when a weld has finished, green lights, beeps, OK on display and many more. These do not mean you have performed a good weld, they just mean the welder has met its programmed criteria.
Manual inspection and adjustment if necessary are more advisable than simply relying on "smart" mode.
For instance if you observe splashout then increase welding pressure to control this.
Example of smart welding on a rear panel. see the vast difference in weld quality as the welder struggles to meet its criteria.
This was caused by incorrect cleaning of the electrode caps as well as smart mode struggling to understand the joint.
0 comments