


Understanding a TIG Welders Functions
New Inverter Digital Synergic TIGS have basically the same synergic programme in all of them. Here we discuss the settings and what each function in a TIG welding synergic graph.
Therefore I hope understanding the functions of this graph means you can set up your welder more easily from model to model.
I personally as an engineer , have found the instructions from manufacturers very complicated, here I will try and simply explain what these settings do and offer some base settings.
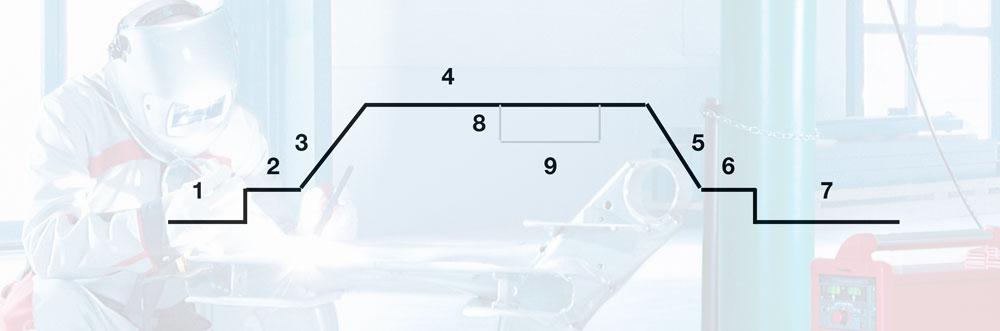
1. Pre Gas
Pre gas is a time setting to ensure that you have gas flowing onto the joint to be welded before you commence welding. This is dependant upon the length of your torch and how long you want to wait to start welding. I usually set a time of 0.3 seconds.
2. Start Current
Start current is used so that full welding current does not come in at the start of your weld as this could damage the material. For this, I typically set the current between 10 or 20 amps depending on what my max amps are.
3. Slope Up
Slope up is the amount of time you want the current to build up to the max setting you have selected. Again this is a personal setting and depends how long you want to get settled at the start of the weld before you need to move. Professional welders will have this set very low so that they can produce quicker, beginners may have a longer time. I would suggest 0.5 to 1.0 seconds
4. Welding Current
This is the welding current you have set to weld your job. I always set on the lower range , especially for the first weld. Then if your setting i sa little low it just gives you more time to develop your pool. There is nothing more difficult that running too hot straight from the beginning especially if your a beginner. Low and slow is always the best option at first.
5. Slope down
Slope down is the amount of time you want the current to reduce up to the base current. This is usually a lot longer than the slope up. Maybe 2 to 3 seconds, even longer if welding aluminium. Doing this reduces the chances of contamination in the finished pool of your weld. This is very critical when welding aluminium as reducing slope down can create crater cracking.
6. End Current
This is the final current setting before it's switched off. Typically I set the same as start current.
7. Post Flow Gas
This serves two functions, it needs to be on long enough to let the weld pool cool while still covered by gas, so reducing impurities and possible weld cracking. It also in air-cooled torches helps cool the ceramic nozzle down as well as this can get quite hot. A hot ceramic can cook the welding gas creating impurities when you restart a weld. I typically set this from 5 seconds to 15 seconds.
8. Pulse Frequency and Time
Pulse frequency is generally used for stainless steels in DC Mode and can also be used on aluminium in AC Mode. Basically the way this works is you have a pulse width (time) and a pulsed current (amps)
The frequency is how many pulses per second you want. For stainless, I like this at 1.0 seconds on and 1.0 seconds off. Some people may find this slow and wish to bead faster but its a personal choice.
The pulse width is how long (time) you want the high current and the low current. Again a nice setting here might be 1.0 x 1.0 seconds
Pulsed Current is what the current will drop too when it pulses. Say you set 100 amps welding current then set 50 amps base current at 1.0 seconds. This means the machine will pulse every second form 100 to 50 to100 to 50 etc.
When I set the bottom pulse I always choose half of the weld current as a start point. remember we are trying to reduce the heat in the weld pool not allow it to go totally cold. If we have too much of a drop between weld current and weld base the weld will be too cold.
Hz (Herz) Frequency Setting
Lots of people
Once you have set up your synergic graph it is very unlikely you will alter it again during normal use.
Happy Welding!
7 Responses


Leave a comment
Comments will be approved before showing up.
Abram Hiebert
October 24, 2024
Need help setting my
250 BWS MAYA WELDER